Help
Expand AllWill I be able to use my existing wireless router to connect to Infinity® System control?
Yes, most home routers are compatible with the Infinity® System control.
Is there a monthly fee for remote access functionality?
No, the remote access functionality is available free of charge.
How do I setup a wireless connection on the Infinity® System control?
Go to the Menu, touch the Down Arrow, and select Wireless. Touch the Enabled button, and then touch Setup a Wi-Fi Connection. Next, touch “scan for available access points”. Touch the name of your Internet connection. Then touch “next”. Modify the security settings. Finally, click “next” and “done”.
What mobile apps are available?
There are applications available for the iPad®, iPhone®, Android™, PC and Mac®.
What are the version requirements for the apps?
Version requirements for smart phones are shown in the app download area of the App StoreSM and Google Play.
Can I use my iPod touch® with the MyInfinitySM app?
Yes, the Apple® mobile app is compatible with the iPod touch® (3rd generation and above).
How do I download the mobile applications?
Visit the Downloads page. There are instructions below the banner with links explaining which software to download for your particular device.
How do I see weather forecast? (SYSTXCCITW01, SYSTXCCITW01‑A and SYSTXCCITC01‑A models only)
The easiest way to view the weather forecast is to touch the weather icon on the Home screen as displayed when you walk up to the control. If you are in the menu and weather screen, there is an option to view the forecast there as well.
How do I sign in to my MyInfinity account?
Visit the home page and sign in at the bottom of the screen.
How do I register on the website?
Visit the Registration page. Enter the required information on each page. To find the required information, on the wall control, go to the Menu, touch the down arrow, then select Wireless. On the wireless screen, touch MyInfinity registration info to access the Serial Number, MAC Address, and PIN.
I forgot my password, how do I recover it?
Visit the Forgot Password page. You will see a screen that will ask for your username or e-mail address. Submitting this information will request an e-mail that will be sent to you with instructions to reset or update your password.
How do I update my address information?
Before you update any of your account information, you will need to log in to your account.
To change the address where your system is located…
- Click on My Locations.
- Click on the Edit Location Information link at the top of the area with the gray background.
- When you are finished making changes, click on Update, in the bottom right-hand corner of the page.
To change the address where you may be contacted…
- Click on My Account.
- Click on the Edit Contact Information link.
- When you are finished making changes, click on Update, in the bottom right-hand corner of the page.
How do I select my dealer?
Log in to your account. Click on My Locations. In the area with the gray background, at the bottom of the screen, there is a label for Dealer. Below this is a link “Select a Carrier ExpertSM” or “Confirm your dealer”. Click this link. On the next page, click on the link to Select a dealer or Confirm your dealer. In the window that pops up, enter your Postal Code and search radius and click Search. After a few moments, a list should appear. Select the desired dealer from the list. When you are finished making changes, click on Update, in the bottom right-hand corner of the page.
What information can my dealer see about my system?
Log in to your account. Click on My Locations. In the area with the gray background, at the bottom of the screen, there is a label for Notification Preferences. Click on the link below labeled Edit Notification Preferences. The next screen will provide you with dealer details, if you’ve selected a dealer, and at the bottom of the screen, you may check the boxes for the information you’d like your dealer to be able to view. When you are finished making changes, click on Update, in the bottom right-hand corner of the page.
I don’t see ventilator settings on my remote access account or in the apps, why?
Ventilator settings are not currently available with the current version of the remote access application. It will be added in the future.
How do I change the type of notifications I receive via e-mail?
Log in to your account. Click on My Locations. In the area with the gray background, at the bottom of the screen, there is a label for Notification Preferences. Click on the link below labeled Edit Notification Preferences. On the next screen, select the desired notification types by checking the boxes. When you are finished making changes, click on Update, in the bottom right-hand corner of the page.
How do I change the e-mail where notifications are sent?
Log in to your account. Click on My Locations. In the area with the gray background, at the bottom of the screen, there is a label for Notification Preferences. Click on the link below labeled Edit Notification Preferences. On the next screen, there are two different e-mail contacts available. Enter the e-mail address or addresses where you’d like to receive notifications. When you are finished making changes, click on Update, in the bottom right-hand corner of the page.
The time stamp on one of my messages seems to have occurred in the future, or in the past. Is this a problem?
There are possible conditions when the time stamp on a notification can be off by an hour. This sometimes occurs if a notification is posted around the top of any hour, and there’s a slight mismatch between the clock in the Infinity® System control and the web server clock. This does not affect any other function of the Infinity® System control, or the web applications, other than the notification time stamp being off by an hour.
How do I view the current status of my system?
Log in to your account. Click on My Locations. In the area with the gray background, you will see the temperature settings for heating and cooling, along with the current temperature and humidity readings.
How do I change settings from the website?
Log in to your account. Click on My Locations. In the area with the gray background, above the Recent Notifications, there is an orange button labeled Change Settings. Click on this button and an application will open in a pop up window which will appear just like the control on your wall. Make any desired adjustments then click on Menu, scroll down, and click on Sync.
Why is “old” information being shown on the website?
If the time shown on your status screen isn’t up to date, click on the refresh button to update the screen.
How do I setup the time to synchronize with the web time?
Both the time zone and enabling time synchronization must be done before time synchronization will begin. Once both steps are done, the time on the wall control will synchronize with the web time based on the time zone selected.
Why can’t I log in to my account?
If you’ve entered your password incorrectly too many times, you’ll be required to reset your password. This is done via the website, not via the smart phone app. Click on the Forgot Password link in the login area of the remote access website. A temporary password will be e-mailed to your address.
How do I use the app if I don’t have an account?
On the login screen of the app, touch or click on Demo in the lower left-hand side of the screen. You won’t have access to your control, but you can see some of the menu screens and access features like photo export and scheduling, which can be uploaded to your control via USB.
Why won’t my heat pump run below 10°F?
If you have an 18VS heat pump, it is designed to work down to 10°F. Below that, the compressor won’t start. There’s nothing wrong with the unit, this is just a design limitation. If you don’t have an 18VS heat pump, there may be a temperature limit that has been set because the heat pump is not as effective as your back up heat source. This is set by the installer.
What if my router is too far from my control to get a good signal?
We have tested a few range extenders that may be used with your Wi-Fi enabled wall control.
My control doesn’t show the Wi-Fi signal strength. Why not? (SYSTXCCITW01 and SYSTXCCITW01‑A models only)
Only the most recent versions of the Infinity control have the capability to measure signal strength. These controls have a model number ending in ‑A. Previous controls do not have this capability.
My clock changed to a completely different time when I upgraded my software. What happened?
New software upgrades include automatic time synchronization with the Internet; the time zone may not be set correctly.
-
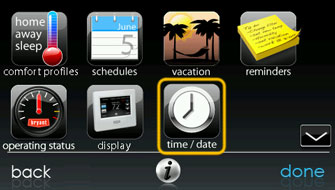
On the wall control, select the “time / date” option in the setup menus.
-
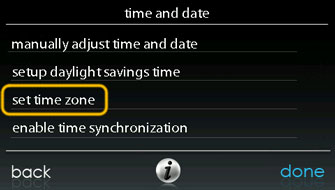
Select “set time zone”.
-
Choose the appropriate time zone, and select “save”.
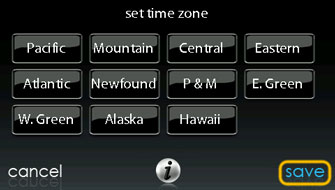
From the “time / date” menu, you can also disable time synchronization, manually adjust time and date when the synchronization is disabled, and setup daylight savings time preferences.
My wall control doesn’t work properly after downloading new software. What do I do?
Try these steps in this order:
-
Cycle power to the wall control by removing it from its base on the wall. This is done by pressing down on the two clips on the top of the wall control and rotating the wall control toward you on the bottom hinges. Re-install the wall control by placing it in the bottom hinges and rotating it back against the base, and re-engage the top clips. Allow the wall control to go through its startup routine. This may take several minutes since the wall control may attempt to re-install the software upgrade.
-
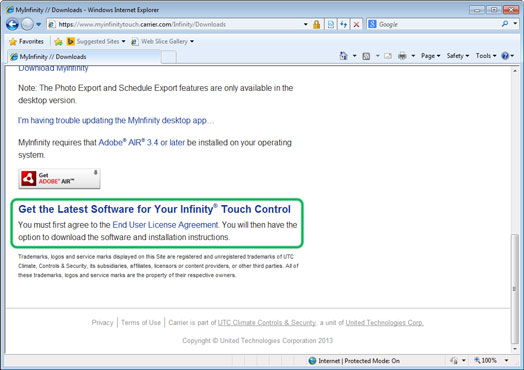
If a power cycle does not clear the problem, you can load the wall control software manually. Go to the Downloads page of the www.MyInfinityTouch.com website. Near the bottom of the page is the link for the software download process. Follow the instructions at that link.
-
If the wall control is still not functioning properly, contact the Carrier® customer care center at 1-800-227-7437, which is available between 8am and 5pm ET, Monday through Friday (holidays may be excluded).
-
Contact your dealer for more assistance.
It takes a long time to log into the MyInfinityTouchSM web page and/or to load the My Locations page on my browser. How can I fix this?
The MyInfinityTouchSM application downloads the latest information for all systems and locations associated with that account when you first log in to give you quick access to that information. This includes all Notifications that have not been deleted. If the log in process is taking a long time, it is likely being caused by a large number of old Notifications being loaded.
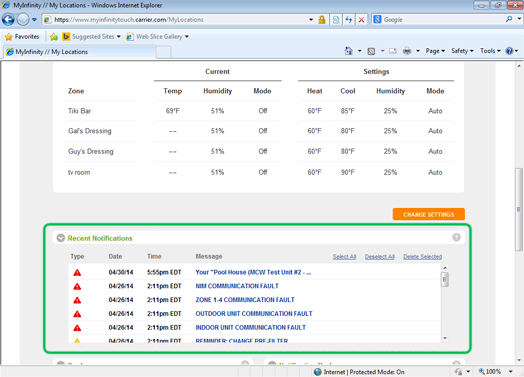
To speed up log ins, delete older Notifications, or any Notifications that are no longer needed. Click on the check marks to the left of the Notifications to select those for deletion, and then click on Delete Selected. To delete all Notifications, click on Select All, and then click on Delete Selected.
How do I enable Amazon™ Alexa™ Skills and connect my Amazon Echo™ device with my Infinity® System Control?
You can find the Amazon Alexa Skill for the Carrier® Infinity® System by going to http://alexa.amazon.com/spa/index.html#skills and searching for “Carrier Infinity Touch Control”.
Open the Skill and follow the directions, including logging into your existing www.MyInfinityTouch.com account from the Skill setup screens.
NOTE: In order to use Amazon Alexa Skills, your Infinity System System Control must be a Wi-Fi® version, connected to the Internet through a home Wi-Fi network, and registered on www.MyInfinityTouch.com. See www.MyInfinityTouch.com for more information.
You can search for other Alexa Skills here: https://www.amazon.com/b?ie=UTF8&node=13727921011.
You can find details on enabling Alexa Smart Home Skills here: https://www.amazon.com/gp/help/customer/display.html?nodeId=201848700
Once you’ve enabled the skill, you must go to the Skills Menu and select Discover Devices, to use your wall control with Amazon Alexa.
What Infinity® System Control functions can I access with Amazon™ Alexa™ Skills and the Amazon Echo™ device?
Alexa allows you to control your current temperature settings, fan settings, and Touch ’n Go™ activity through the Carrier Infinity System Skill. For all other settings, use the MyInfinity mobile app.
The terms “command” and “utterances,” below, can be used interchangeably.
NOTE: In order to use Amazon Alexa Skills, your Infinity System System Control must be a Wi-Fi® version, connected to the Internet through a home Wi-Fi network, and registered on www.MyInfinityTouch.com. See www.MyInfinityTouch.com for more information.
How should I name my Infinity® System, Infinity System Control and zones for use with the Alexa™ Skill for Carrier Infinity® Systems?
Ensure that all controls and zones within your account have unique names. There should not be any duplicate names present within your www.MyInfinityTouch.com account. Avoid using numerical characters. Place spaces within system, system control or zone names for better recognition by Alexa. Do not enable both the “Carrier Infinity Touch Control” and “Bryant Evolution Connex Control” Amazon™ Alexa™ Skills. Enabling both will cause Amazon Alexa Smart Home to discover and list your devices twice.
The [device name] used below is the name of an Infinity System Control, Infinity System, an individual zone in an Infinity Zoning System, or an Alexa group.
For example, if your single-zone Infinity System is named “My Home,” then the [device name] becomes My Home.
For Infinity Zoning Systems, the [device name] is the name of each individual zone, such as Master Bedroom, as named in the Infinity System Control.
If the [device name] used is the name of the Infinity System or the Infinity System Control, zone 1 of a zoning system will be controlled.
NOTE: All names of all systems and zones within each Infinity account MUST be unique; that is, no two systems or zones in a MyInfinity account may have the same name.
For example, if there are two Infinity Systems in one account, not only must the system names be unique, but no two zones in the account may have the same name. That means that Main Home and Vacation Home cannot both have a zone named Master Bedroom or Living Room, for instance.
If the names of Systems and Zones are not unique, confusion will ensue.
You can edit Infinity System names within the www.MyInfinityTouch.com consumer portal. Go to My Locations, and select Edit System Preferences, next to the name of each system.
You can edit Infinity Zoning System zone names on the Infinity System Control, or in the MyInfinity mobile app. From the Main screen, select Menu, then select Zone Names.
After you rename a System or Zone, you must go back to the Smart Home menu in the Alexa app and Discover Devices again, so that the changes will take affect in Amazon Alexa.
How do I control the current temperature settings with the Alexa™ Skill for Carrier® Infinity® Systems?
You may use any of the following commands (“utterances”) to control the temperature using Alexa.
- Alexa, set the [device name] temperature to 68 degrees.
- Alexa, change the [device name] to 68 degrees.
- Alexa, turn my [device name] temperature to 68 degrees.
- Alexa, set [device name] to 68.
- Alexa, increase the temperature to 68 degrees in the [device name]
- Alexa, lower the [device name] temperature by 4 degrees.
- Alexa, cool down my [device name] by 4 degrees.
- Alexa, raise the [device name] by 4 degrees.
- Alexa, make my [device name] warmer by 4 degrees.
- Alexa, increase the [device name] temperature by 4 degrees.
Note that the word order used when giving Alexa a command is very important. If you ask Alexa to make a change that she doesn’t understand, you may need to change the way you say it for it to understand what you want to happen. See the “utterances” above.
When controlling the temperature settings via Alexa if the [device name] used is the name of the Infinity System, zone 1 of a zoning system will be controlled.
Controlling the temperature via Alexa will activate a Manual Touch ’n Go™ activity hold with heat and cool setpoints to attain the requested temperature for the current mode (Heat, Cool or Auto). The manual activity hold is scheduled until the start of the next program period. For Infinity System Controls running firmware version less than 14.00, the hold is scheduled until the end of the current day (12:00 am).
These commands never change your current system mode (Off, Heat, Cool, or Auto). The system mode can be changed on the Infinity System Control, or the MyInfinity mobile app.
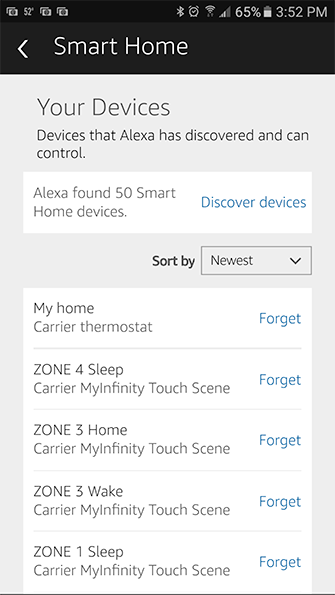
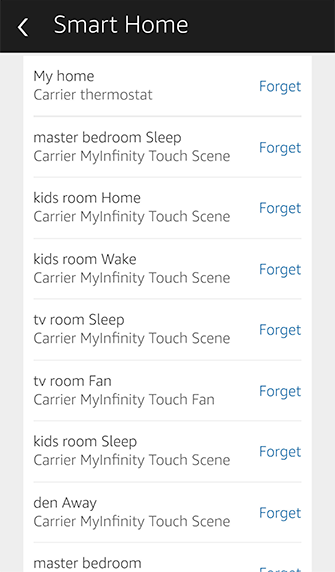
It may be helpful to review the device list in your Alexa Smart Home screen in order to find the names of available devices in your system. See the screenshot below for an example of available zones.
How do I control the current fan settings with the Alexa™ Skill for Carrier® Infinity® Systems?
You may use any of the following commands to control the fan using Alexa:
- Alexa, Turn off [device name] fan
- Alexa, Turn on [device name] fan
- Alexa, increase [device name] fan by “50” percent.
- Alexa, decrease [device name] fan by {number} percent.
The [device name] is the name of an Infinity System Control fan, zone fan, or an Alexa group.
When controlling the fan settings via Alexa if the [device name] used is the name of the Infinity System, zone 1 will be controlled.
Controlling the fan settings via Alexa will update the fan settings of the current Touch ’n Go™ activity (Home, Away, Sleep, Wake, or Manual).
When a “Turn On” command is used Alexa will attempt to set the fan setting to the last setting prior to the fan being turned off.
When setting the fan setting to a specific percentage, Alexa interprets the percentage as follows:
- Auto = 0%
- Low = 1% – 33%
- Med = 34% – 66%
- High = 67% – 100%
When using the “Increase” command Alexa will always increment the current fan setting.
Example: If the current fan setting is “Low” and you use a “Increase fan by 1%” command Alexa will update the fan setting to “Med”. If you repeat the same command then Alexa will update the fan setting to “High”.
When using the “Decrease” command Alexa will always decrement the current fan setting.
Example: If the current fan setting is “High” and you use a “Decrease fan by 1%” command Alexa will update the fan setting to “Med”. If you repeat the same command then Alexa will update the fan setting to “Low”.
If the current fan setting is “Low” and you use a “Decrease” command Alexa will update the fan setting to “Auto”.
If the current fan setting is “Auto” and you use an “Increase” command Alexa will update the fan setting to “Low”.
Note that, as of 3-20-2017, the only “utterances” you can use for setting the fan speed are Low and High. To set the fan to Medium, you must use a percentage, or increment/decrement as shown above. The command for Medium fan may be added in the future.
How do I control the current Touch ’n Go™ Activity with Alexa?
You may use any of the following commands to control the Touch ’n Go™ activity using Alexa:
- Alexa, Turn on [device name] activity
…where activity is one of the Touch ‘n Go activities of Manual, Home, Awake, Sleep or Away.
The [device name] is the name of an Infinity System Control, zone, or an Alexa group.
When controlling the Touch ’n Go™ Activity settings via Alexa if the [device name] used is the name of the Infinity System, zone 1 will be controlled.
When a “Turn On” command is used Alexa will update the currently running activity to the specified Touch ’n Go™ activity. This activity will continue until the start of the next program period. For Infinity System Controls running firmware version less than 14.00, the activity will continue until the end of the current day (12:00 am).
Am I able to change the Infinity® System mode between Heat, Cool, Off and Auto with the Alexa™ Skill for Carrier® Infinity® Systems?
At this time Alexa does not support this functionality. You can change the system mode on the Infinity System Control, or use the MyInfinity Touch apps to accomplish this functionality.
What if none of my questions are answered here?
Call the customer care center at 1-800-CARRIER and they will either answer your question, or they will research the question and respond when they have the answer.